MX Merchant – Payment Links
MX Merchant lets you create payment links that can be used on your website, or sent to your customers via email or text.
Finding Payment Links
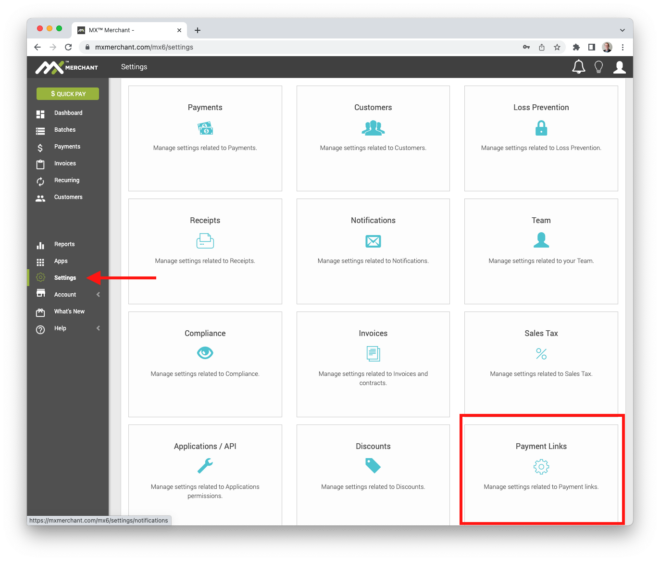
The first step to creating or managing a Payment Link is to Login to MX Merchant. Once you’ve done that, you select Settings from the left hand navigations, then select Payment Links from the sections on the right.
Payment Link Landing Page
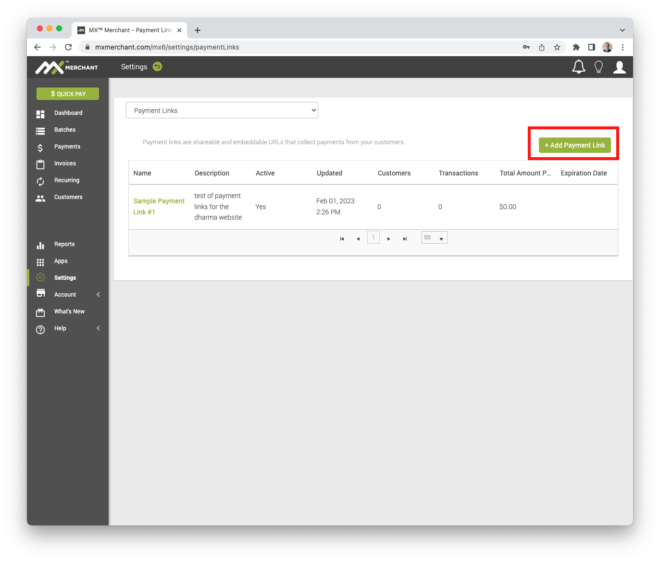
You should now be at the Payment Links landing page. From here you can manage existing Payment Links, or create new ones. To add a new Payment Link, select + Add Payment Link in the upper righthand corner of the page.
Setting up a Payment Link
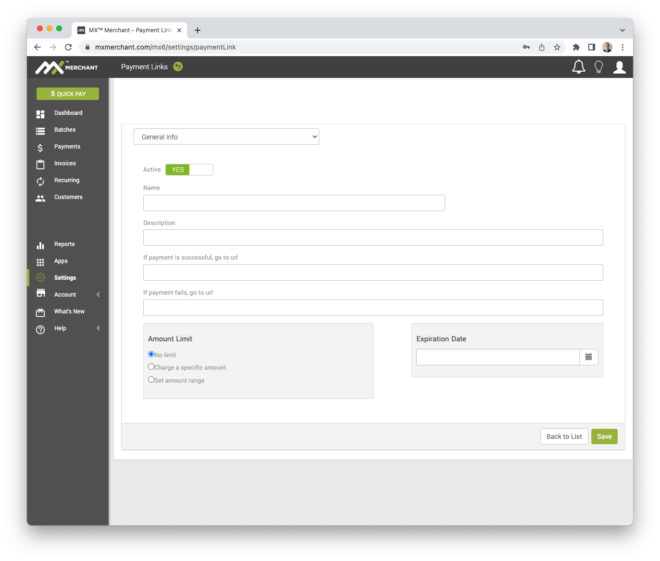
You use the Add Payment Link screen to enter all the relevant details about a Payment Link. These include:
- Whether or not the Payment Link is currently Active;
- The Name of the Payment Link;
- The Description;
- A URL to direct your users to on success – usually a thank you page;
- A URL to direct your users to on failure – usually some sort of error screen and an offer to retry the transaction;
- The Amount Limit – this can be none, a single value, or a range of values; and
- An optional Expiration Date – if you would like the Payment Link to shut down after a certain period of time.
Setting Basic Information
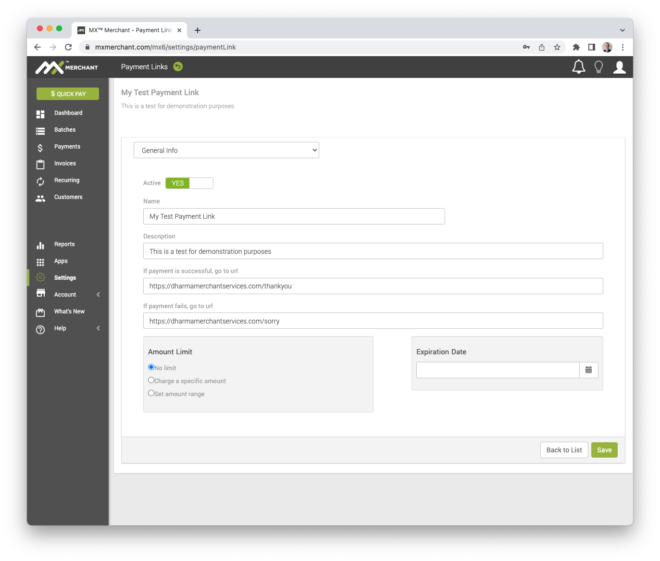
The key fields for your Payment Link are its Name, the Success and Failure URLs, the Amount Limit, and that it is Active. We recommend you make the URLs as intuitive as possible, not only to help you keep track of where you are sending customers, but also because they will see the URL they are directed to, and it helps if they are self-explanatory.
A Description is a nice to have if you are going to be doing a lot of payment links, much like a note to yourself as to what this link is about.
The Expiration Date is only needed if you would like the link to cease working automatically, without you or your team having to remember to Deactivate it.
You can see an example to the left of a filled-in Payment Link. Note in this example, there is no limit to the amount that can be processed via this Payment Link.
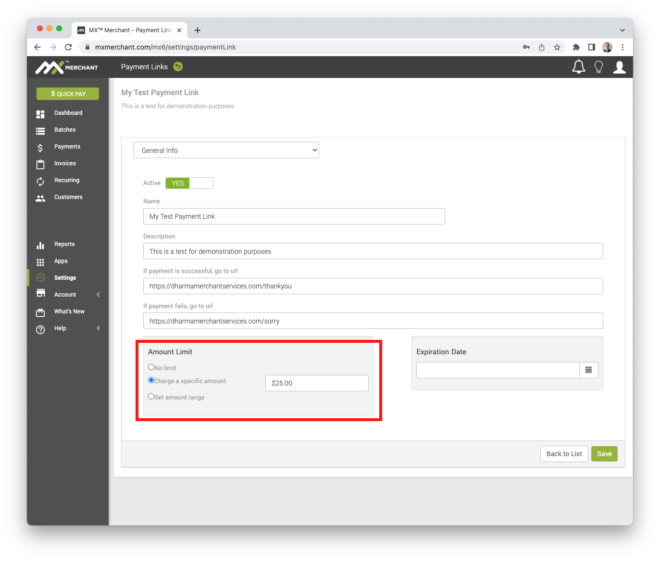
Setting a Specific Amount
If you know you will be using the Payment Link for only one purpose – say a donation of $25.00 – then it is appropriate to set a Specific Amount. This can streamline your customers checkout process, and keeps the link from being used for unexpected reasons.
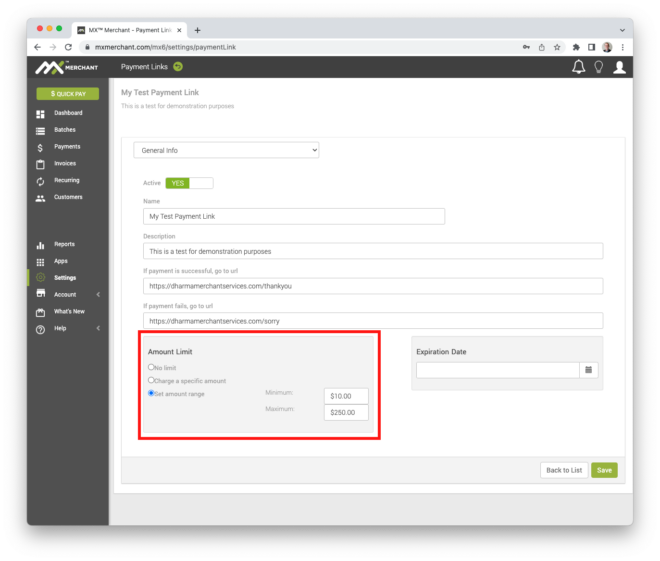
Setting an Amount Range
One of the nice features of Payment Links is the ability to set an Amount Range for the link.
This can be helpful in preventing fraud – for example, most fraudulent card testing is for $1.00 or less, so setting the range of your Payment Link to be inline with your normal processing amount can keep these small transactions from taking place.
The same is true for an upper threshold – if you know you will never process beyond a certain amount, set the amount range to go no higher than that.
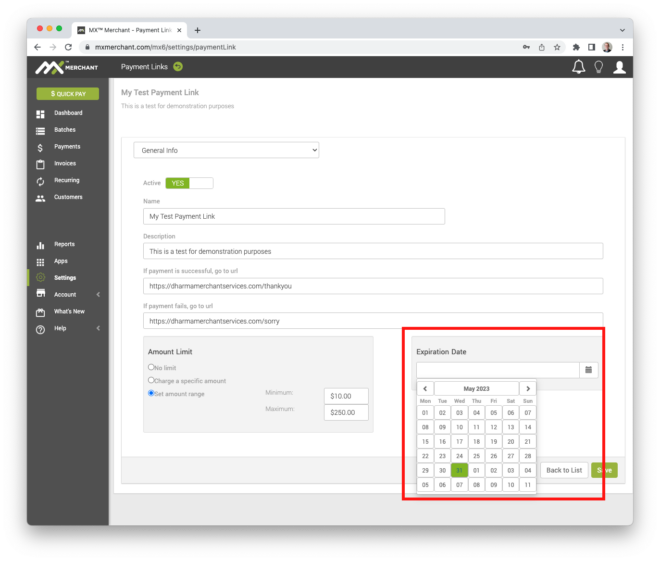
Setting an Optional Expiration Date
If you have a Payment Link you only want to use for a specific period – say a campaign that ends on a certain date – then setting an Expiration Date is a great way to keep the Link from being used when it is no longer needed. Keep in mind this is optional, and not needed when creating a link. You can always Deactivate a Payment Link manually if you no longer want your customers to be able to access it.
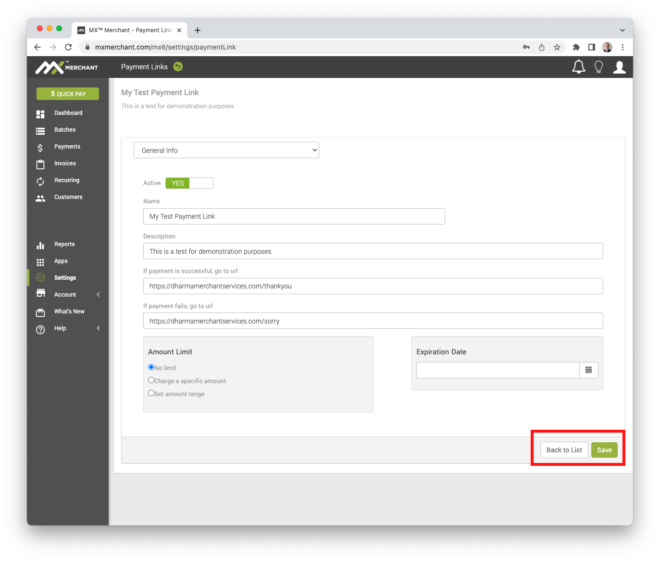
Saving your Payment Link
This may seem obvious, but once you’ve set all the details for your Payment Link, make sure to select Save in the lower right hand corner of the form. You can also go Back to List if you decide you don’t need it. And don’t worry about setting everything upfront – you can Edit an existing Payment Link at any time.
Using the Payment Link
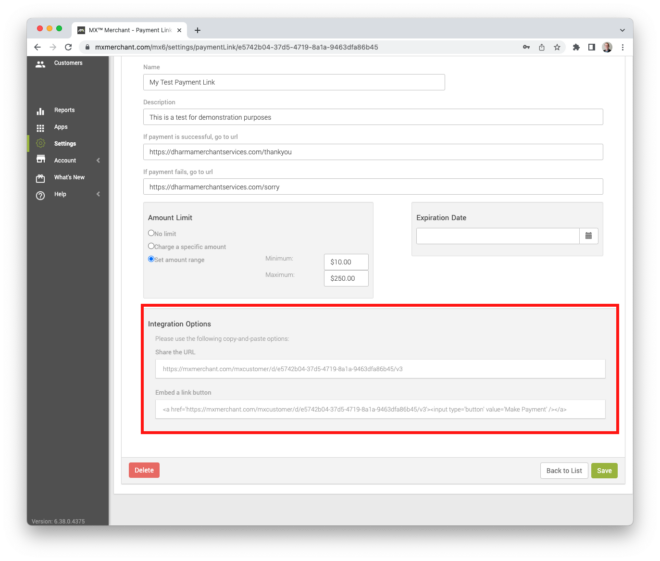
Once you have saved a Payment Link, you get some new options at the bottom of the Payment Link form – Integration Options. Here you are given two ways you can use the Payment Link:
- Share the URL – this gives you a standard URL you can use in an email or text that when clicked will take your customer directly to the associated Payment Page;
- Embed a link button – this is HTML code that you can place on a standard web page, where it will appear as a button to be clicked by your customer. This can also be used in an HTML email where it will appear as a button instead of a link.
The Resulting Payment Form
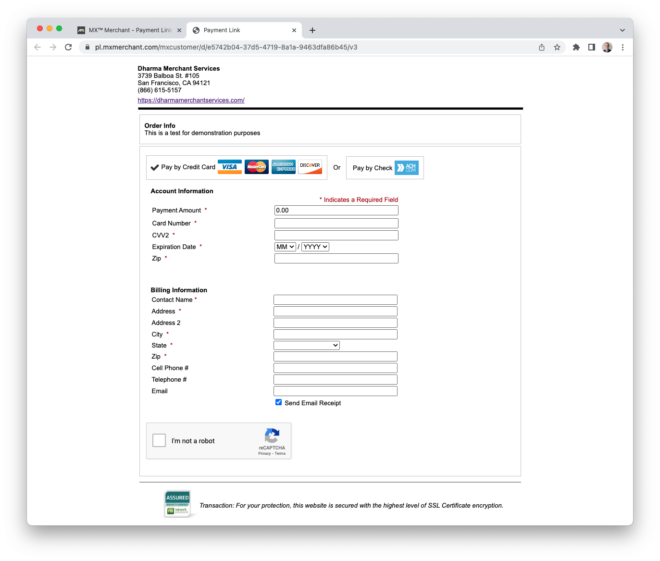
Now that you’ve created your Payment Link, what happens when your customer clicks on it? They are taken to the associated Payment Form for this link.
The form is pretty straightforward – it captures card Account Information, and also Billing Information for your customer. There is also a built-in reCAPTCHA to reduce automated fraud attempts.
You will also note that at the top of the Payment Form is where the Description in your Payment Link is displayed to your customer.
Customizing the Payment Form
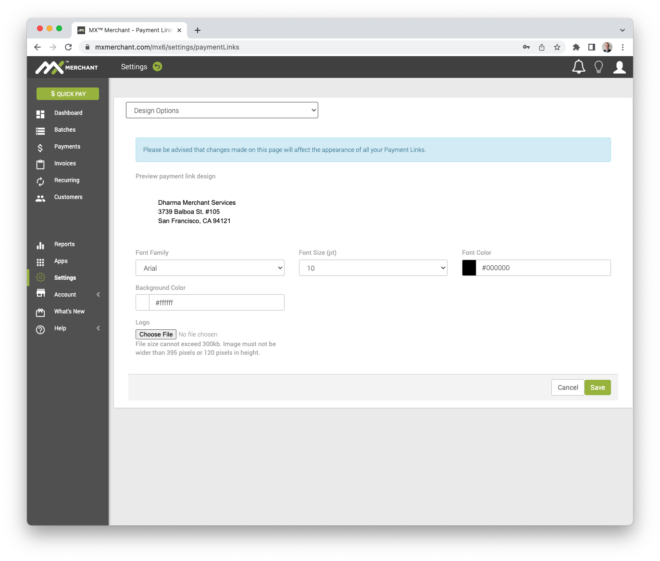
The Payment Form allows for a limited amount of customizations to the look and feel, largely around updating fonts, faces and colors to more closely match your own website or corporate look and feel.
You access the Payment Form Design Options from the Payment Link Landing Page – the dropdown menu at the top offers two other options – Design Options and Manage Custom Fields. We’ll talk about Custom Fields in the next section.
Please Note: this is a global setting, common to all Payment Forms – you cannot customize the Payment Forms individually.
Setting up Custom Fields
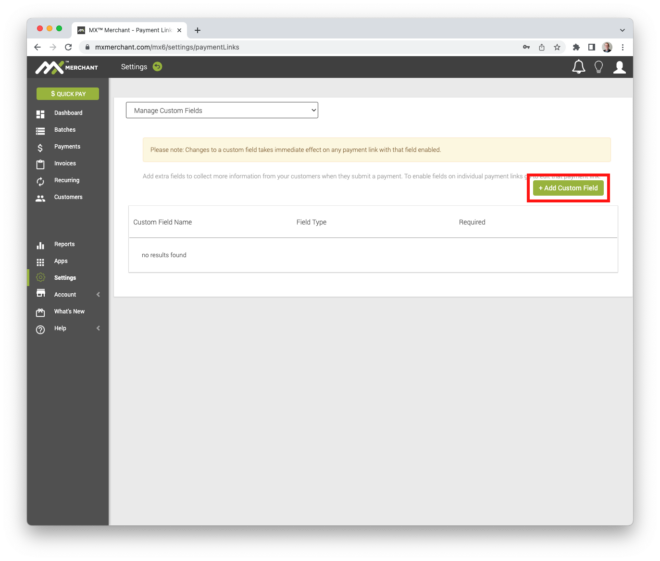
The final option to Payment Forms is the ability to capture custom data. To do this, you select the Manage Custom Fields option in the dropdown menu on the Payment Links Landing Page. From here you can create new Custom Fields, and manage existing ones.
When managing an existing Custom Field, note that any changes made immediately affect all Payment Links that use the field.
To add a new Custom Field, select + Add Custom Field in the middle righthand side of the Manage Custom Fields page.
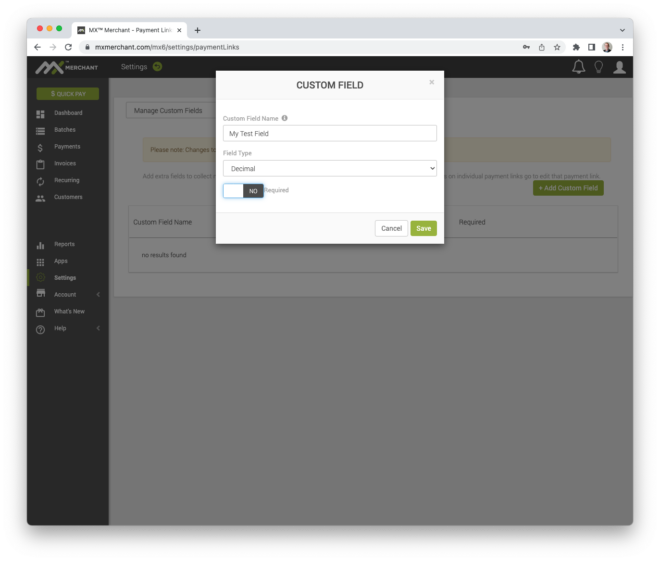
Custom Field Options
When you create a new Custom Field, you can have a variety of Field Types you can use:
- Text – collect simple text data;
- Yes/No – collect an answer to a question;
- Number – collect an integer number from your customer;
- Decimal – a number with decimal places;
- List – let your customer choose from among a list of options.
You also set up the Name of the field, and if the field is Required, or if your customer can skip the field with no issues.
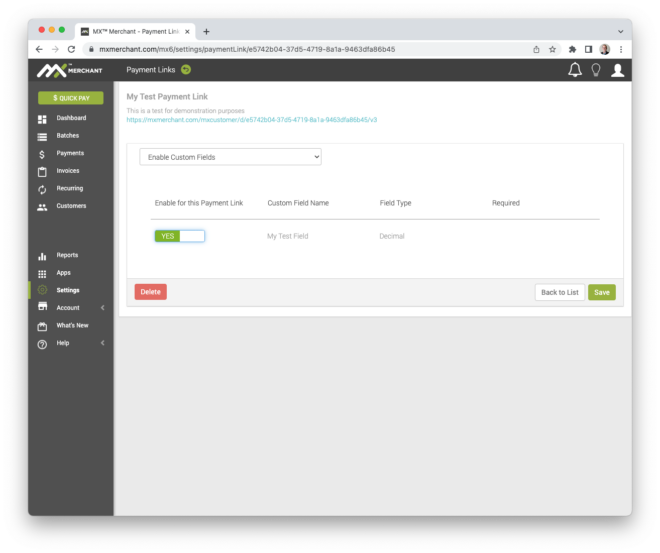
Using a Custom Field
If you’ve set up Custom Fields, you still have to turn them on for each Payment Link you want to use them in.
To do this, you select the Payment Link you want to edit from the Payment Link Landing Page, and then select the Enable Custom Fields option from the dropdown menu at the top of the Payment Link page (its default state is General Info). Here you will see a list of all Custom Fields you have created, and you can select just the ones you want to use for each Payment Link.
Make sure to Save any changes you make on this page.
Styling your Payment Link Button
The great thing about Payment Links is the fact that they are URLs pointing to a secure Payment Page hosted within MX Merchant. Because of this, you can use standard HTML code on your website to affect how the Payment Link is displayed. The Implementation Option Embed a link button gives you some pretty basic HTML code you can use as a starting point for your own look and feel.
For the example Payment Link we created above, the code we are given looks like this: “<a href=”https://mxmerchant.com/mxcustomer/d/b5772485-fd6c-4bc4-bc67-9b925d267746/v3″><input type=”button” value=”Sample Payment Link” /></a>”. And that creates this button:
Using CSS or an HTML Style tag, you can change the button to look like anything you would like as long as the embedded URL doesn’t change. For the Dharma site, we like our buttons to look like this: